How to Remove Dried Paint Drips and Splatters: a Step-By-Step Guide for Post-Construction Cleanup
This down-to-earth guide walks you through safe, hands-on tricks pros use to bring painted surfaces back to showroom condition.
Whether you’re fixing up your own home after a weekend project or sweeping through a job site as a hired cleaner, dried paint drips and splatters will almost always show up. Even a tiny dot on a countertop, cabinet door, or window pane can make freshly completed work look careless.
Knowing how to lift that paint off is about more than good looks; the right technique protects the surface underneath and gives you the smooth, even finish everyone expects. Pulling together tradesmen’s advice and time-tested practice, this guide shows you safe ways to remove old paint quickly without causing new damage.
On larger sites where paint removal is part of an all-out clean, professional builders cleaners can supply industrial tools, trained staff, and the speed that lets the project handover go on schedule.
Know Your Paint Before You Scrub
Before you reach for a solvent, scraper, or heat gun, take a moment to figure out what kind of paint you are dealing with. Water-based and oil-based formulas respond very differently to common removal methods, and using the wrong one can ruin the surface or simply leave the splatter stuck.
Water-based paints—latex or acrylic—tend to come off more easily after they cure, because their film stays slightly porous and yields to rubbing alcohol. In contrast, oil-based paints dry into a tough, solid coat that often demands stronger solvents or manual methods like sanding or scraping.
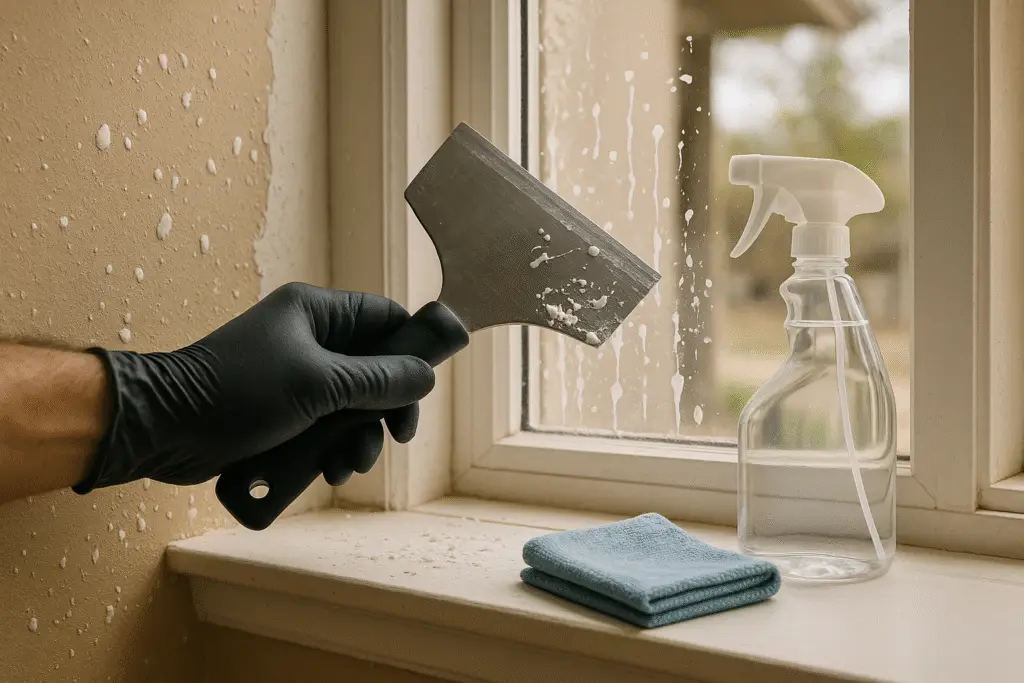
Method 1: Gentle Mechanical Removal
Best Application: Hard, non-porous surfaces including glass, tile, laminate, and sealed wood.
When liquid solutions fail or extra caution is needed, this physical tactic is the default move. By scraping with care, you can lift the paint while leaving the underlying finish intact.
Essential Tools:
- Fine plastic scraper or small putty knife
- Safety razor blade (glass only)
- Clean damp cloth
- Spray bottle with plain water
Step-by-Step Process:
- Lightly mist the target area so it is just damp. The moisture reduces friction, makes the paint a touch softer, and cuts the risk of scratching.
- Hold the scraper at about 45 degrees to the surface. As advised by Bob Vila, this angle keeps the edge sliding rather than digging, speeding removal while protecting the substrate.
- Push forward with light, steady pressure and let the blade do the work. Move in a single direction, not back and forth, to peel off the paint neatly and avoid ragged edges.
- Keep the surface damp all the way through, and spray or wipe on more water whenever things begin to dry out.
If you’re working on glass, a safety razor blade can work wonders, but technique is key. Angle the blade at roughly forty-five degrees, keep the pane wet, and avoid dragging the edge across dry patches. And when windows are splashed with paint and coated with cement dust, it’s worth reading up on safe methods for cleaning cement and concrete grime from glass surfaces so the end result is streak-free.
Method 2: Heat Softening Technique
Best Application: Dried paint dots, thick runs, or spots where solvents just won’t cut it.
Applying gentle heat makes the old paint stretchy instead of brittle, so it lifts away with far less elbow grease. This trick shines with extra-heavy layers that refuse to budge under a normal scraper.
Required Equipment:
- Hair dryer or low-setting heat gun
- Plastic scrapers or putty knives
- Heat-resistant gloves
- Well-ventilated workspace
Professional Application:
- Set your heat source to low or medium. As the crew at This Old House warns, cranking the dial runs the risk of scorching wood or melting plastic.
- Apply heat evenly to the spot for thirty to sixty seconds, holding the nozzle six to eight inches away.
- Test the paint’s softness by brushing it lightly with a plastic scraper. If done correctly, the surface will feel warm and begin to flex.
- Scrape while still warm. Move quickly; the film hardens again as it cools.
Safety Tip: Heat guns can exceed 1000°F, so always work in a well-ventilated area while wearing gloves and goggles. Avoid high settings near plastic edges or electrical outlets.
Method 3: Targeted Solvent Use
For old paint you can’t scrape, solvents remain the most adaptable option because each type suits a specific coating or substrate.
Water-Based Paints:
Isopropyl Alcohol (70-99%)
Isopropyl rubs out dried latex and acrylic film because its chemistry breaks down the water-miscible binder.
How to Use:
- Moisten a clean cloth or cotton pad with alcohol.
- Lay it over the spot for 30-60 seconds.
- Rub gently in circles until the paint lifts.
- Rinse with clean water and let the area dry.
According to OnDemand Painters, pairing this technique with very light scrubbing yields the best finish.
For Oil-Based Paints:
Mineral Spirits or White Spirits
These solvent products—both petroleum distillates—soften the oils in paint yet remain safe on most painted, glass and metal surfaces.
Professional Application:
- Moisten a lint-free cloth or pad with the liquid.
- Press it on the spot and let it sit for 5 to 10 minutes.
- Carefully wipe or scrub until the paint lifts.
- Remove residue with soap, water and a second clean cloth.
- Rinse, dry and inspect the section for uniformity.
Universal Spot Treatment:
Acetone (Nail Polish Remover)
For flakes that cling tight, a drop of acetone quickly softens the bond. Apply sparingly; its strength can harm paint, varnish or plastic beneath.
Paint removal is just one part of full post-construction cleaning. Sites also create clouds of dust, plaster chips and oily finger marks that need separate tools and methods. For step-by-step advice on those tasks, visit our complete construction dust removal strategies tailored to Australia’s materials and climate.
On bigger jobs where paint scars mingle with tiles, glass and timber debris, our trained builders cleaning services supply heavy-duty machines, safe chemicals and the know-how to clear every surface fast.
Safety-First Application:
- Test in a hidden corner before going larger.
- Dab a small amount of acetone directly onto the paint spot.
- As soon as the paint softens, wipe the area clean.
- Rinse with water so the solvent does not harm the surface.
Important: Acetone exposure in the workplace should stay below 1,000 ppm, so always work in good airflow and wear gloves and goggles.
Eco-Friendly Alternative:
Citrus-Based Solvents
These greener removers lift paint while being gentler on health and the planet.
Benefits:
- Lower toxicity than classic solvents
- Fresh citrus aroma
- Fully biodegradable
- Works on both water- and oil-based paints
Use citrus products the same way you would acetone, but plan for a few extra minutes of dwell time.
Safety Protocols and Surface Protection
Because paint removal can be risky for workers and finishes, strict safety procedures and surface guards are essential at every step.
Personal Protective Equipment (PPE):
- Slip-on, chemical-proof gloves so solvents don’t touch skin.
- Clear, shatter-proof goggles to keep splashes out of eyes.
- A fitted respirator or mask when using solvents in tight areas.
- Long sleeves, cuffs tucked in, to guard exposed skin.
Workspace Preparation:
- Open windows and set up fans for steady, fresh air flow.
- Move or cover nearby furniture to shield it from drips.
- Keep a charged fire extinguisher within arm’s reach.
- Post emergency numbers where everyone can see them.
Surface Testing Protocol:
Before any method touches visible paint, test it in a hidden corner. That quick check protects the surface and proves your choice won’t cause harm. Heat, solvents, and scraping behave differently on wood, drywall, or tile, so comparing reactions is vital.
Quick Testing Steps
- Pick a spot that no-one easily sees (behind a fridge or under a couch)
- Dab your cleaner on a tiny patch
- Leave it alone for a full day
- Watch for colour change, dulling or any scratches
- Go ahead only if nothing bad shows
Full-Cleaning Workflow
Following a clear plan helps you get even results and keeps surfaces safe.
| Phase | Action | Estimated Time | Key Considerations |
|---|---|---|---|
| 1. Assessment | Confirm paint type and surface material | 5-10 minutes | Record findings for future reference |
| 2. Preparation | Collect tools, run a test strip | 10-15 minutes | Always test in a hidden corner first |
| 3. Initial Removal | Use light scraping with a plastic blade | 5-20 minutes | Keep the area damp; hold the blade at 45 degrees |
| 4. Heat Application | Apply controlled heat to tough patches | 10-30 minutes | Keep the nozzle moving; watch for smoke |
| 5. Solvent Treatment | Saturate cloth with matched solvent | 15-45 minutes | Work in small areas; wear gloves and a mask |
| 6. Final Cleaning | Wipe up residue with soap and water | 10-15 minutes | Rinse cloth often; check for slippery spots |
| 7. Inspection | Inspect and touch up any missed spots | 5-10 minutes | Test surface with a clean, dry finger |
Troubleshooting Stubborn Paint
Tip: When early steps fail, layer your tactics. Heat the spot again, apply fresh solvent, then lightly scrape while it’s still mushy.
Surface Shows Signs of Damage
Immediate Action: Halt work, and rinse the area with lots of clean water. If the surface is valuable, call a restorer before you do anything else.
Multiple Paint Layers
Approach: Start with the top coat and peel off one layer at a time. This way you don’t swamp the surface and can steer the job more easily.
Large Coverage Areas
Strategy: Tackle small patches 2 to 3 feet wide so the solvent doesn’t set before you lift it. Moving methodically this way gives even results over the whole area.
Professional Results and Quality Assurance
Top-quality work hinges on watching every step and checking results as you go.
Final Inspection Checklist:
- ✅ All stray paint spots wiped away
- ✅ No lingering solvent smell or film
- ✅ Surface is intact—no scratches, etching, or fading
- ✅ Work area cleaned, dusted, and fully dry
- ✅ Original finish left in place, undisturbed
Post-Removal Care:
Once paint has been safely lifted, give the surface a little extra attention so it stays that way:
- Add the right protectant—a wax for wood, a sealer for stone
- Note the cleaning steps you took for the record
- Store leftover solvent as the label directs
- Bin rags and containers according to local green rules
When to Call Professionals
Most paint-removal jobs are DIY-friendly, yet a few cases call for seasoned hands:
- Thick layers that need power gear
- Precious antiques that can’t afford a slip
- Lead dust or asbestos that demands a specialist
- Deadlines that leave no room for trial and error
- Frustrating failures that suggest advanced tools are needed
For thorough post-construction cleaning that bundles paint removal with every other must-do task, see Perth’s complete builders cleaning checklist and cover your whole post-build cleanup.

Conclusion
Knowing how to get rid of dried paint gives contractors and DIYers alike the chance to fix surfaces without gouges or scratches. Once you recognize the paint you’re dealing with, pick the right tool or solvent, and stick to sensible safety steps, even tough spots feel manageable.
Always remember that taking your time and using the correct technique wins out over rushing in with a heavy hand. Stop, size up the problem, test your chosen method on a hidden area, and keep your goggles and gloves on until the final wipe. Follow this advice and you’ll turn splattered walls, floors, or trim into clean, job-site-ready surfaces that lift the entire build or reno.
Investing a little extra effort now protects your work later, giving paint-sensitive materials the chance to stand up to sunlight, cleaning, and daily use for years.
Need post-construction cleaning in Perth? Majestic Vacate Cleaning Perth offers full builders cleans, expert paint-stripping, dust removal, and whole-property touch-ups. Call us on (08) 6185 0866 for spotless, worry-free results.