Step-by-Step Guide for the Removal of Ceiling Mould Ahead of Move Out Checklist
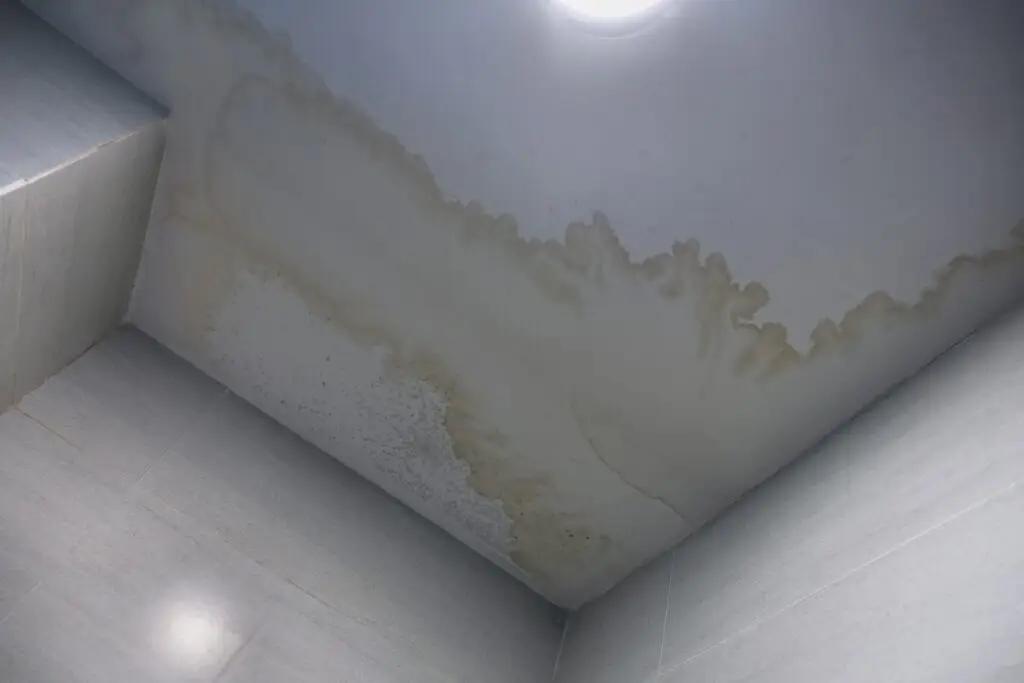
Ceiling mould is not only aesthetically displeasing but also poses health risks like allergies. The growth of mould can damage rental properties due to water leakage and is a sign of poor ventilation. In case you are moving out of a rental, you need to give special attention to ceiling mould if you want to pass the final inspection and retain the security deposit. It’s crucial to understand the comprehensive end of lease cleaning services such as what causes mould in the bathrooms and other parts of the unit, who is responsible for making the repairs, the proper way to get rid of it, and when to get in touch with the professionals.
Taking care of mould and fungi growth on the ceiling should be taken care of while vacate cleaning the property when preparing to end the lease. Most tenancy disputes stem from the issue of mould which can lead to problems with your landlord or estate agent during the final inspection. Proper mitigation and cleaning not only help to protect the bond return but also prevents the possibility of the issue being escalated to tribunals or other consumer affairs authorities.
Investigating the Cause of Ceilings Being Moldy
Mould is a type of fungus that develops on construction materials that contain organic nutrition. Some of the most common sources in Australian homes include:
- Condensation of air conditioning: Water dripping off of air-conditioners or condensation within ductwork can drip onto your plaster ceiling.
- Roof and plumbing leaks: Damaged tiles, failed waterproofing or burst pipes can cause water to seep into drywall due to inadequate sealing.
- Excessively humid indoors: Bathrooms, laundries, and kitchens without the required ventilation propagate condensation on ceilings.
- Poor insulation: Surfaces that are warmer than the moist air coming from cooking or showering in contact with cooler ceiling materials tend to render it cold.
It grows on biological material contained in the drywall, plaster and timber components of the structure. Optimal conditions for mold are 20°-30°C and above 60% humidity. In renting units with poor ceiling ventilation system, flood roofs tend to struggle with rapidly settling fungus on ceiling, walls and furniture.
Boundaries of Responsibility Between Tenant and Landlord
When Mold Growth Is Your Obligation
- 10 square feet or less: Classified under customary care provisions in the lease agreement. For example removing small areas of mold growth on the shower cabin, on bordering parts of windows or ceilings in the bathroom demonstrates adequate maintenance, helping the tenant maintain the property and obtain their full bond refund.
- Prevention during tenancy: Fanning the windows, operating exhaust fans during cooking or bathing, wiping of the tiles and glass fog, and placing the furniture away from the walls so as to provide the appropriate breathing space for movement of air ensures prevention.
When Mould Is The Landlord's Obligation
- Structural issues and urgent repairs: Email immediately to report roof leaks, plumbing issues, broken extractor fan, and failed seal waterproofing. These issues get classified as landlord responsibilities with consumer protection laws and residential tenancies acts such as WA’s Residential Tenancies Act.
- Evidence for tribunal: Capture all reports of emails with timestamps, dated photos, maintenance request forms, and notice of breaches. This will ensure you have documented evidence that can help you prove the claims that you made to a tenancy tribunal.
Health Risks And Property Damage
- Respiratory health risks: Mould spores within indoor air quality are susceptible to triggering allergies, chronic coughs, and terrible asthmatic attacks. Vulnerable people include those with weak immune systems, kids, and old aged tenants. Regular usage of vacuums that have HEPA filters drastically reduce airborne mold particles up to 85% within a fortnight according to research.
- Toxic mold related severe health conditions: It can cause chronic breathing problems if you are exposed to some types of mould like Stachybotrys chartarum, usually found on water damaged ceilings, over a long period of time. As a precautionary measure, Australian health authorities recommend clearing any mould concerns straight away.
- Mould damages falling within the scope of your bond: Mould munches its way through building materials like plaster, paint, timber, carpets, and even upholstery which results in permanent stains. Of these damages surpass the expectations of normal wear and tear in your contract, it may be too costly for you.
Clearing a mould problem early will save your health, security deposit, and potential disputes that may arise over who is responsible for extensive repairs with the landlord.
Equipment Needed and User Safety
To make the cleanup process consistant with the standards set in the CDC’s Official Mould Cleanup Guidelines Ensure to have the following items preapared before climbing to the ceiling:
- Respiratory Protection: N95 or its equivalent to keep out spores (important for prevention of an allergic response).
- Eye Protection: Safety goggles that tightly seal around the eyes to prevent irritation caused by spores.
- Gloves: Chemicals cleaning and fungi contact should be avoided while wearing nitrile or heavy-duty rubber gloves.
- Protective clothing: Disposable coveralls to protect off contaminants like clothing and upholstery.
- Containment materials: Undergarments to protect furniture and carpet include painter’s tape and plastic sheeting (minimum 0.15 mm thick).
- Cleaning arsenal: Microfibre towels for dry finishing, sponges, and for spraying vinegar or bleach solutions; spray bottles, buckets, extension poles for high ceilings, toothbrushes for detail work, and stiff-bristled brushes.
Steps For Setting Containment And Ventilation
- Isolate the room: Close off doorframes and windows with painter’s tape combined with plastic sheeting to completely seal any potential pathways for spores to escape.
- HVAC Circulating System: Use tape and plastic to mask air conditioning vents and heating ducts to stop possible circulation of spores.
- Control negative air pressure: Set an electric fan at an open window facing towards the room.
This sets up ventilation that directs spores out instead of further into your rental property in accordance with EPA guidelines.
- Remove valuable items: Remove electronic devices, important documents, and fabrics from the burst because spores of mold can contaminate surfaces over time.
Using appropriate containment strategies during your mold remediation will control spore deposition and prevent mold growth on your belongings, protecting them from being considered expendable of mold colonies. This is especially important in regard to rental properties to keep disputes with landlords over cleaning standards at bay.
Effective Cleaning Solutions
Do one of these for your mold remediation (never mix cleaning chemicals as this can create toxic gases):
- White vinegar solution: Combine equal parts water and white vinegar in a spray bottle. The acetic acid of vinegar actually destroys upwards of 82% of common molds found in bathrooms and kitchens, and unlike most paints used on ceilings, the vinegar does not harm the finish. After applying vinegar, no rinsing is needed as the smell fades when it dries.
- Bleach solution for non-porous surfaces: In a well-ventilated area, combine 1 cup of household bleach with 3 liters of water in a bucket. Recap the room (splashing onto skin or into eyes should be avoided) and apply carefully using a sponge. Rinse within 10 minutes to prevent damage to paint or plaster. While bleach works well on bathroom tiles, it is not as effective on porous materials like drywall because it does not penetrate them.
- Tea tree oil mixture: For a natural antimicrobial solution that isn’t as harsh as bleach or commercial cleaners, fill a spray bottle with water and infuse it with 10 drops of tea tree oil.
- Commercial antimicrobial products: Enzyme or antimicrobial cleaners bought from the store that are specifically made for mold removal can outperform homemade cleaning solutions in breaking down bacterial and fungal growth. These types of specialized cleaners come in handy when dealing with stubborn mold infestations in rental properties.
- Hydrogen peroxide option: Light mold stains can safely be washed using 3% hydrogen peroxide solution from a spray bottle because it lacks the odor that bleach has.
Before widespread use, make sure to test your cleaner of choice on a small and discreet area first to ensure that it does not damage paint, discolor tiles, or affect the finish of plaster ceilings and walls.
Safe Mould Removal Steps for Ceiling Surfaces
Make sure you read these steps in removing the mould from the ceiling of your rental property:
- Prepare the room: to prevent the spreading of spores, remove all personal belongings to the room, and place carpets, furniture, and any other items in sheeting of plastic.
- Safety first: ensure you put on your protective gear which includes a mask, eye, and hand protection before cleaning.
- Remove loose spores: using a vacuum cleaner coupled with a brush that has a HEPA filter, gently scrub and vacuum the areas with mould.
- Apply cleaning solution: ceiling surfaces must first be dampened with the recommended cleaner while being cautious of drips.
- Allow dwell time: leave antimicrobial solution to sit which checking product directions for 10-15 minutes.
- Scrub the ceiling: Using a brush with stiff bristles, apply firm pressure in a circular motion to the affected area while ensuring that the plaster is not damaged.
- Address bathroom ventilation: While waiting, clean any exhaust fan covers for better airflow.
- Rinse if needed: take a damp sponge and wipe the area to avoid exposing plaster or paint to the dangers posed by molecules of bleach used in the cleaner.* Remove all scrubbing residue: In case water is spilled or any area is cleared, immediate floor cleaning is required to avert any sign of dripping or potential new mould growth.
- Search for Remaining Marks: Looking for leftover traces using a bright torch light is also perfect, and along with the walls getting meeting the top ceiling needs special extra attention considering possible traces within the corners.
- Repeat if necessary: stubborn makes their mark along the shower ceiling and their elusive presence within laundry spaces. Their return requires a second lurking.
This combination captures best practices for cleaning consistent with high standards for professional mould remediation while assisting in meeting the cleanliness standards required in the cleaning clause of your lease agreement.
Stopping Mould From Reoccurring In Rental Properties
After removing the mould from the ceiling, take the necessary steps described below to not only avoid conflicts with your landlord, but also mitigate the risk of the mould returning:
- Ceiling surface treatments: Treat the ceilings of areas such as bathrooms, showers, and laundry rooms with mildew resistant antimicrobial paint ASTM D-5590 authorized pigments to avert resurgence of mould growth.
- Tackling moisture pathways: Collaborate with your landlord to enhance building plumbing, ducted system insulation, roof tile sealing, and undertaking more measures to restrict condensation along air conditioning duct connection points.
- Managing indoor humidity levels: Maintain automated indoor humidity control systems set to less than 60% in wet locations extensively using exhaust fans for bathrooms both during and after showers, kitchen fan while cooking, and ensuring laundry proper ventilation washing.
- Optimizing air movement: Position furniture away from the walls, keep doors open when not in use, and activate ceiling fans to circulate air to and from all rooms.
- Scheduled inspection: Inspect ceiling areas in bathrooms, window edges, and sink quarters once a month after significant use of air conditioning systems during and after storms to overcome excess moisture capture to prevent mould growth.
- Provide supporting evidence: Maintain records for your cleaning schedule and any preventative measures as these records can significantly defend your bond refund should mould issues come up due to underlying issues out of your control.
These steps not only promote a cleaner living environment, but also showcase to the property manager that the tenant is compliant with their obligations throughout the lease period.
When to Call Professional Mould Remediation Experts
In case a person meets DIY methods stated above, it is important to get professional cleaning services if:
- The affected ceiling area exceeds 10 square feet (approximately a 3ft × 3ft patch)—larger regions increase risks of spreading spores through your rental.
- Household members have severe allergies, asthma or other respiratory conditions and a compromised immune system making DIY cleaning unsafe.
- Suspected asbestos is present in older properties in Australia (pre 1990). Asbestos might be in ceiling materials. Never disturb without professional testing.
- Significant air conditioning duct repairs and extensive plumbing work or roof replacements are termed major repairs that need to be completed before cleaning. If this is done, it is termed as cleaner’s structural damage.
Some landlord policies cover professional mold remediation if damages incurred are due to insured events like storms or burst pipes.
- If mould keeps coming back, there is a chance that the source of moisture is hidden and needs expert detection. This is termed multiple failed DIY attempts.
Other than the above factors, licensed mould remediation specialists have their own specialized equipment. These include moisture meters, thermal imaging cameras, commercial dehumidifiers and professional grade HEPA filtration systems. Following strict antimicrobial protocols allows them to provide documentation that can be needed in disputes over bond refunds or repair responsibilities. These documents can be beneficial to tenants and landlords.
Strategy To Follow As A Tenant Struggling With Mould Issues On The Ceiling
- Report repairs that require urgency: Send a message to your real estate agent or landlord right away detailing water damage, leaking ceilings, broken plumbing, or defective ventilation along with photographs of the damage. Ensure you keep a copy for yourself.
- Provide detailed evidence: Provide evidence by taking pictures, which are time sensitive, along with notes on issues you may have with your health to further document your case. Keep copies of all correspondence sent.
- Handle minor concerns: Using the guidelines set out elsewhere in this document, remove minor patches of mould growing on the fan in the bathroom and on the ceiling. Always ensure to keep receipts of any materials purchased.
- Check your lease: Look over rental contracts for the specific clause relating to mould, cleanliness, and other maintenance issues.
- Track repairs done: Make a note of when the work is completed, alongside the other documents that have been issued, if the landlord determines that there should be professional level cleaning and remediation done, or an emergency plumber is called.
- Follow-up shown post cleaning or repairs: A period not clearly defined must be allowed after the 4-week long deep clean or repairs, although there are a few spots that should be constantly monitored for new burst of mould.
- Legislations on the issue of responsibility for the care given to the asset being held in dispute: In the event that there is a discrepancy on the return of the bond sent, or obligation to perform repairs, find out from the document protecting consumers pertinent to your jurisdiction where you have registered (like Consumer Affairs, Victoria, or Fair Trading in New South Wales) for the governing reference state of information.
Taking documents that will support your case protects all of your superseded health needs to maintain, alongside any claim set against your health where the condition impacted on your security deposit, rendered on the basis of poor conditions where, when adequate measures are taken, captures the sensitivity of the condition.
If extensive issues with mould still exist, think about reaching out to a tenancy solicitor or a local tribunal for assistance.
Conclusion
Ceiling mould should be seen as a health hazard, a risk to your security deposit, and damage to the rental property. Leaving a rental property in that condition is not, however, detrimental to the property’s value; understanding the source of moisture in the kitchen and bathroom, understanding one’s rights under tenancy law, and applying the appropriate professional guidance regarding mould removal does. Maintaining accurate records becomes increasingly important in case there are disagreements about the information with an estate agent or a landlord.
Proper planning and implementation of cleaning strategies helps tenants meet their cleaning goal. In your case, whether dealing with minor mould infestation on the shower ceiling or more serious issues within other parts of the bathroom, taking action and documenting every step make all the difference to guarantee a successful end-of-lease inspection and bond refund.
Ceiling mould requires more than just uderstanding cleanliness procedures. As a tenant, there is an expectation to maintain good indoor air quality, mitigate damage to the property, and uphold one’s side of the tenancy agreement. In the rare case whereby a landlord causes unreasonable strictures in dealing with legitimate mould issues, state consumer protection entities, such as Consumer Affairs Victoria and NSW Fair Trading, are ideal representatives to advise on how to address the appropriate steps in resolving the issue before they are escalated to tribunal hearings.